With the first true battlecruiser design, typed as Grosen Kreuzer, German designers turned the table on the British. One could see the size of a ship and count her guns
but could not see or measure armor protection. British writers did not know that the
Blucher had a stronger armor scheme than the British battlecruisers and assumed
a six-inch belt as in previous armored cruiser designs. “
Of the successors of the Blucher, being German Indomitables or Dreadnought-cruisers, little is known. The
Von der Tann, launched in March, 1909, is to be completed in the spring of 1910.
” (The Naval Annual 1910, page 32) This first mention of von der Tann
attributed her with twelve 11-inch gun, presumably arranged as the 11-inch guns of
Nassau or the 8.2-inch guns of Blucher. Nothing was mentioned about armor,
except in a table at the back of the volume, which mentioned an eight-inch belt for
von der Tann, but put in the caveat “particulars doubtful”. With the von der Tann
German designers set the pattern for the entire line of battlecruiser construction for the High Seas Fleet. The ship had minimalist superstructure, presenting a low
target, inferior main armament to British contemporary construction (11-inch vs 12-inch) but most importantly, far superior protection. Although always classified as
battlecruisers, the German designs were more akin to fast battleships. Gone was the mistake of the wing turrets of
Blucher, instead the von der Tann improved upon
the British practice of spacing amidship turrets far enough apart to allow cross deck fire. The
von der Tann was a direct reply to the Invincible class but was far
superior in every category but main armament.

To make up for the lost time in the design and construction of the
Blucher, even as von der Tann was completing design work and being laid down, another
improved
von der Tann was finishing its design process. Less than eight months after the start of von der Tann, the first of this class was laid down on December 7,
1908, also at the Blohm and Voss yard in Hamburg. This was to be
SMS Moltke. Similar in appearance to the von der Tann, the Moltke class was larger and heavier
than
von der Tann. Displacement jumped from 19,400 tons in von der Tann to 22,616 tons in Moltke. Part of the displacement increase was taken up in the increase
in size from 562-feet, 9-inches length and 87-feet beam in
von der Tann to 610-feet length and 96-feet, 9-inches in beam. With an increase of almost ten feet in beam,
the
Moltke could be given even greater number of compartments, further increasing survivability of the design. Although turret and barbette armor stayed on par with
9-inches, the
Moltke class increased the width of the main belt from 9.84-inches in von der Tann to 10.75-inches in Moltke. One need only compare the armor belt of
Moltke with the contemporary British battleship HMS Neptune, laid down six weeks after Moltke with an 11-inch armor belt, to see that the German battlecruisers
were fast battleships. In contrast with
Moltke, the second class of British battlecruisers, the Indefatigable class, simply carried over the same six-inch armor belt from
the
Invincible class, with Indefatigable being laid down February 23, 1909, two and a half months after Moltke. The increased size of Moltke not only allow greater
armor and survivability to be worked into the design, but also allowed greater offense capability. The same 11-inch gun was retained but the increased length allowed a
fifth turret to be added. This was added in a superfiring position aft. This made
Moltke the first German warship with superfiring main armament. Although Moltke
beat the British
Neptune in being laid down with superfiring main armament, both powers were late in incorporating this subsequent standard practice, as the United
States Navy had used superfiring turrets from the start of the
Dreadnought era. The sister ship to Moltke was SMS Goeben and since she was in the 1909
construction program instead of the 1908 program with the
Moltke, Goeben was laid down exactly one year after Moltke, on December 7, 1909, also at Blohm and
Voss. One other increase to offensive abilities was the placement of the secondary 5’9-inch casemate guns. The deck break from forecastle to main deck in
von der
Tann
came at the forward superstructure but the deck break in Moltke came at the aft superstructure. As a consequence the secondary guns of Moltke were located
one deck higher than those of the preceding design.
Only Goeben was included in the 1909 program, as the rest of the capital ships were battleships. The 1910 program saw a redesign of the Moltke. Laid down
February 4, 1911 the
Seydlitz was a one-off design, which sought to address weaknesses of the previous class. To provide a drier forecastle, it was raised one level.
The
Seydlitz had two deck breaks, one at the end of the forward superstructure and the second at X turret, compared to the single deck breaks for the von der Tann
and
Moltke classes. Length again increased to 656-feet but in an odd retrogression for German designs, beam was reduced by three-feet to 93-feet, 6-inches. This
was done to provide a better under-water hull form for higher speed. During trials
Seydlitz attained 28.1-knots, developing 90,000shp. In partial compensation to the
narrower beam, the armor belt was increased to 11-inches maximum thickness and the maximum armor on turrets and barbettes to 10-inches.  
Seydlitz retained the
same main gun turret arrangement as the
Moltke class but caliber was increased from 45 to 50 caliber, with the longer barrel offering increased range and muzzle
velocity. Completed May 22, 1913,
Seydlitz was the last battlecruiser to join the High Seas Fleet before World War One and was flagship of the scouting squadron
when the war began. Although
Seydlitz was a superb ship, it was clear to the German Admiralty that their battlecruiser designs were falling intolerably behind British
battlecruisers in terms of offensive abilities. The
HMS Lion laid down in November 1909 upped the ante by increasing the main armament of British battlecruisers
from 12-inch main guns to 13.5-inches with a far greater shell weight, improved accuracy and longer range. It was one thing to accept a trade-off of 11-inch main
guns vs 12-inch guns in British battlecruisers, given the advantages achieved in German designs, but German designers could no longer accept a main armament of
11-inch guns. A complete redesign would have to be done of the type to break from the initial
von der Tann/ Moltke/ Seydlitz series.

Every major system was examined for the complete redesign of the German battlecruiser. Primary consideration was given to the main armament. The 12-inch
(305mm) gun used on the German battleships was selected. To save weight the echeloned wing turrets of the previous designs was eliminated and four centerline
turrets with superfiring B and X turrets incorporated.  With the inclusion of two heavier superfiring turrets in the new design, something had to be done to decrease
top-weight. Accordingly, the design eliminated the raised forecastle, making it the only flush deck German capital ship design to see service of World War One. The
name ship of the class was
SMS Derfflinger, laid down January 1, 1912, followed by SMS Lutzow in July. Length was increased by over 30 feet longer than
Seydlitz with Derfflinger measuring 690-feet. Beam was increased to 95 feet but the design was still narrower than the Moltke and Goeben. The armor scheme also
increased with maximum belt width of 11.8-inches and turret and barbette armor of 11-inches. Machinery was designed to use oil, as well as coal, although Germany
had no internal source for fuel oil. The power plant consisted of 18 Schulz-Thorneycroft feeding steam to four Parsons turbines producing 63,000 shp for a
maximum speed of 26.5-knots.
SMS Lutzow was laid down in May 1912 at the Schichau Yard in Danzig in May 1912. She was launched November 29, 1913, five months after Derfflinger but her
construction slowed with the coming of the First World War. In May 1916, after
Lutzow had finished her work-up, an operation was designed to sweep the
Skagerrak and Kattegat and got underway early on May 31, 1916.  For this operation
Lutzow made her initial appearance as the flagship of Hipper’s squadron.
Although the Royal Navy knew something was afoot, the British didn’t know exactly what the Germans were up to but the Grand Fleet steamed out of Scapa Flow
and Beatty’s battlecruisers left their separate base at Rosyth, on the night of the 30th, before the High Seas Fleet left the next morning.

The German Fleet steamed north paralleling the Danish coast, while the Grand Fleet steamed eastward. As Hipper steamed north 50 miles ahead of the German
battleships, he flew his flag in
Lutzow. This time he had all five of his available ships. At 3:00PM Beatty and Hipper were 50 miles apart and may have missed each
other, except for the presence of the Danish tramp steamer
N. J. Fjord. The steamer was midway between the British and German battlecruisers and both sides
could see the steamer. Both sent out light ships to investigate and accordingly sighted each other. At 3:28PM British opened fire on German torpedo boats and the
greatest naval battle of World War One, the Battle of Jutland, had begun. The first portion of the battle has been called the
run to the south, as Hipper tried to lure
Beatty south to be destroyed by Scheer’s battleships. Hipper had five battlecruisers in column,
Lutzow (flag), Derfflinger, Seydlitz, Moltke and von der Tann
against Beatty’s six ships (
Lion (flag), Princess Royal, Queen Mary, Tiger, New Zealand and Indefatigable. However, Beatty was also supported by the 5th Battle
Squadron of
Barham, Warspite, Valiant and Malaya of Queen Elizabeth Class, armed with eight 15-inch guns. There was separation between the British
battlecruisers and battleships caused when the battlecruisers turned south and the battleships continued east, having missed the signal flags on Lion due to the heavy
smoke emitted by the battlecruisers.

Sixty miles separated Hipper from Scheer’s main fleet and at 4:00PM Hipper signaled for each ship to engage its opposite number. Visibility aided Hipper as the sun
was to the west, highlighting Beatty’s ships, while the low-profile, light gray German battlecruisers merged with their darker background to the east. Although Beatty
had an advantage in maximum range of main guns, he didn’t use it, as the range between the battlecruisers rapidly closed. It was Hipper’s ships that opened fire at 4:
48PM.  One of the significant factors in the
Run to the South was fire distribution. Both Admirals wished to engage all of the enemy battlecruisers but Hipper had
one less ship so one of the British ships had to be uncovered. This was
New Zealand as von der Tann engaged Indefatigable last in line, rather than New Zealand,
5th in line.  However, for Beatty, he had the advantage of numbers and wanted to have two ships fire on
Lutzow, while the remaining four German battlecruisers
would receive fire from one ship.
Queen Mary, which had not received the distribution of fire signal, engaged the Seydlitz, 3rd in line, leaving Derfflinger
uncovered. For ten minutes
Derfflinger was left unmolested by British fire. Without shell splashes obscuring her fire, Derfflinger could fire very accurate salvos at
her target, the
Princess Royal. From the start, the German ships struck early and often. Both Princess Royal and Tiger had turrets put out of action. Queen Mary,
always a crack gunnery ship, knocked out X turret of
Seydlitz when one of her 13.5-inch shells penetrated the barbette armor at 4:57PM and ignited four charges
(compared to the 62 ignited in a similar hit on the barbette of Y turret at the Battle of Dogger Bank). The anti-flash precautions put in place after Dogger Bank
contained the damage just to X turret. At 5:00PM a 12-inch shell from
Lutzow hit Q amidship turret on Lion. The armor roof was peeled off and except for the
bravery of mortally wounded Major F.J.W. Harvey, RM, who ordered the magazine doors closed and magazine flooded, burning charges most likely would have
reached the magazine, destroying the ship. The British had not learned the lesson that the Germans did at Dogger Bank and still had lax anti-flash procedures.
Three minutes later these lax anti-flash procedures were more dramatically demonstrated. Von der Tann and Indefatigable had been engaged in a ship to ship duel for
fifteen minutes.
Indefatigable was hit aft by two or three 11-inch shells and then by two more forward with her next salvo. Initially no smoke or flames were observed
but after over 30 seconds the
Indefatigable exploded. The lengthy delay from the hits to the explosion strongly indicates the loss was caused by a lack of proper anti-
flash procedures, rather than a direct penetration of a magazine.
Von der Tann had little time to enjoy her victory because at 5:06PM Barham of the 5th Battle
Squadron opened fire on
von der Tann. As the other Queen Elizabeth class battleships entered firing range, they concentrated fire on the last two German
battlecruisers with two on
von der Tann and two on Moltke.  He range was initially over 19,000 yards and with the tremendous amount of smoke lying between the
German battlecruisers and the
Queen Elizabeths, the British battleships could only fire intermittently. Nonetheless the von der Tann and Moltke were surrounded by
the towering splashes of the 15-inch shells. Also by 5:16PM
Derfflinger shifted fire from Princess Royal to Queen Mary and the crack gunnery ship of the British
battlecruisers was engaged by
Seydlitz and Derfflinger. Queen Mary was hit by three shells out of a four shell salvo and nothing seemed to happen until the next salvo
arrived at 5:25PM when there were two more hits. Again there was nothing initially apparent, other than some black smoke. Suddenly, the
Queen Mary was enveloped
in a massive explosion amidships and forward, as the
Queen Mary broke in half. As with the Indefatigable, the substantial delay between the shell hits and magazine
explosion, demonstrates the loss of the ship was caused by lax anti-flash procedures, rather than penetration of a magazine.

Beatty was still confident, the 5th Battle Squadron had rapidly closed the German battlecruisers and he still foresaw the destruction of Hipper’s force. A very ominous
portent arrived at 5:38PM when the light cruiser
Southampton reported sighting the entire High Seas Fleet deployed in battle column, approaching from the south. This
report was followed by the same report from the light cruiser
Champion. Beatty ordered at turn to the northwest, towards the Grand Fleet, at 5:43PM. The “Run to the
South
” had lasted 58 minutes, during which the German battlecruisers had scored 42 major hits on the British battlecruisers, destroying two of them, and two more hits
on battleships of the 5th Battle Squadron. In turn Hipper’s ships had been hit 17 times, eleven from the battlecruisers and six from the 5th Battle Squadron.
Von der
Tann
and Seydlitz each had one turret permanently put out of action and Lutzow had a large hole on the forecastle, which would eventually play a part in the loss of the
ship. Now began the “
Run to the North” during which Hipper and Scheer, confidently expected bagging a significant portion of the British Fleet. Just as Hipper had led
Beatty to the High Seas Fleet, Beatty was now returning the favor by leading the entire German Fleet to the Grand Fleet.
Hipper had reversed his battlecruisers at 5:50PM to be in the van of the German battleships. All of his ships were still able to maintain speed. Even after Seydlitz took a
torpedo hit from a British destroyer at 5:57PM, her speed was unimpaired. Initially Hipper’s ships were still firing on Beatty’s battlecruisers but as they became out of
range, Hipper shifted fire to the 5th Battle Squadron. During this fight Hipper’s ships were slowly but steadily being pounded with 15-inch hits and Hipper slowed his
force to 15-knots in order to allow the German battleships to close the gap. At 6:50PM Beatty’s battlecruisers were sighted by the lead battleship of the starboard
column of the Grand Fleet. Hipper and Scheer were still unaware of the presence of the Grand Fleet. In the van of the Grand Fleet was the 3rd Battlecruiser Squadron,
consisting of the three ships of the
Invincible Class. Earlier the squadron commander Rear Admiral Horace Hood ordered his squadron to increase speed so that they
could rejoin Beatty’s battlecruiser force. At 6:55PM, Hood’s ships were already 25 miles ahead of the battleships, when they engaged German light cruisers of the fleet
screen. It was another half an hour before Hipper found his ships engaged from two directions with battleships to the north and the 3rd Battlecruiser Squadron to the
Northeast. Aboard
Derfflinger the gunnery officer clearly sighted Hood’s flagship, HMS Invincible, and opened fire on the very first battlecruiser. At 7:31PM one of
Derfflinger’s shells struck Invincible amidship and in a short span the amidship magazine. Lutzow also claimed credit but the fatal strike is generally attributed to
Derfflinger. However, before her sudden loss, Invincible had struck a fatal blow at Lutzow. One of her 12-inch shells pierced the forward armored bulkhead of
Hipper’s flagship, allowing progressive flooding from the bow to amidships. At 7:33PM Scheer ordered his fleet to simultaneously turn south in order to get his ships
out of the concentrated gunfire of the Grand Fleet as quickly as possible. Hipper didn’t get the order but conformed with the turn at 7:38PM. His
Lutzow was losing
speed from the progressive flooding and could no longer keep up with his other ships. The
Lutzow was in such a poor state that Hipper and his staff left the ship and
transferred to the torpedo boat
G39 a little before 8 PM. By 7:50PM the British capitol ships had lost sight of the German ships and Jellicoe assumed they had all turned
south to reach the safety of German ports. He accordingly turned the Grand Fleet to the southeast.

Scheer had made another turn to the east with his battlecruisers, led by
Derfflinger, to assume the point position ahead of the battleships. This turn put him in a direct
collision course with the Grand Fleet. By 8:12PM the fleets had again made contact. Only the muzzle flashes of the British ships could be made out and battlecruisers
and lead battleships were taking punishment. At 8:13PM Scheer ordered his battlecruisers to attack the enemy fleet and at 8:18 ordered the battleships to again reverse
course simultaneously.  With the four battlecruisers charging the entire British fleet,
Lutzow was separated and out of action, the battlecruisers were each being
engaged by multiple ships.
Derfflinger especially suffered with Bruno (B) and Dora (Y) turrets quickly knocked out, with each turret loosing almost every man of their
crews. Again, the improved German anti-flash precautions proved their worth, as the flash of exploding charges in the turrets and handling chambers didn’t reach the
magazines. The German battlecruisers closed to within 7,700 yards of the nearest British battleships but their “
Death Ride” had served its purpose. The High Seas
Fleet had disengaged successfully. At 8:20PM it was time to extradite the battlecruisers from the massed firepower of the Grand Fleet. In coordination with a massed
destroyer torpedo attack, the battlecruisers turned to the west to disengage. For a while they remained unengaged but at 9:18PM they were seen by Beatty’s
battlecruisers at a range of 8,500 yards with
Derfflinger and Seydlitz receiving heavy punishment. The German ships turned further to the west to get out of British
fire. With the heavy smoke and steadily failing light conditions of twilight, the firing ceased but Scheer was in a predicament with the Grand Fleet blocking the direct
line to the German ports. The
Derfflinger and von der Tann, whose top speed had been reduced to 18-knots, fell in behind the German battleships. Moltke and
Seydlitz moved towards the head of the German line. As the night progressed Seydlitz and Moltke separated and each ship ran into British battleships at very close
ranges. On each occasion they were sighted but the British chose to withhold fire because they didn’t want to disclose their location with gun flashes. This is
somewhat puzzling because their location could be reported by the German battlecruisers. Scheer turned his fleet to the East and passed behind the Grand Fleet in the
darkness. At midnight the lonely
Lutzow was steaming south at 7 knots and was still hoped to reach safety but the severe punishment taken forward created a
cascading damage situation. By 1:30AM the forward boiler room started to flood and the ship tried to proceed stern first but was unable to do so as the 8,000 tons of
water forward caused her propellers to rise out of the water. At 2:20 AM the ship was abandoned and at 2:45 two German torpedoes finished her off.
Flyhawk Model SMS Lutzow Limited Edition - Flyhawk initially released their SMS Lutzow kit in 2013.  In 2014 this kit, the Limited Edition SMS Lutzow kit
was released. I believe that this kit was the first instance of
Flyhawk having two kits on the same subject, the standard kit and the more expensive, limited edition or
bonus kit. It seems that current
Flyhawk practice is to have the standard kit in a black box and the limited edition in a white box. The limited edition kits provide
something over and above the standard kit. Sometimes the additional item is extra photo-etch or plastic parts or rigging thread. In the case of the
Lutzow kit, the
extra bonus material is a totally new kit, the German torpedo boat
G-37. The size of a contemporary destroyer, the G-39 of this class was the ship that removed
Admiral Hipper and his staff from the heavily damaged
SMS Lutow at the Battle of Jutland.         

For years
Flyhawk has been producing outstanding brass photo-etch parts to enhance the build of the kits from other manufacturers. I believe the Flyhawk kit of
USS Ward, Pearl Harbor flush decker was their first plastic kit but Flyhawk soon followed with the Derfflinger and Lutzow. The Lutzow hull is two-piece divided
along the centerline. They have subsequently gone to one-piece hulls, which I prefer. There are four parts on the A sprue, the two halves of the hull and two torpedo
nets. The hull sides have the right lines with anchor hawse lines, armor belt lines, torpedo net shelves and porthole placement. The
Lutzow kit doesn’t have
eyebrows (rigoles) over the portholes. Their newer kits do have them. However, one thing provided in the kit that is not provided in most WWI kits are the torpedo
nets. Even in 1:350 scale these nets would have to be scratch-built. If I remember correctly, the old WSW resin kits had the nets cast as part of the hull and
NNT
provided a thin, pliable rubber tube for them. The rolled plastic nets in the
Flyhawk Lutzow are very well done in including net band detail, plus they have the correct
size to fit on the shelves on the hull. Net boom locater holes make attaching the separate booms easy.

There are two B sprues but some parts are not used, which is denoted in the instructions by being grayed-out (smallest steam launch and certain ventilators). I have
not checked yet but they must be for the
Derfflinger kit, as there were differences between the two sisters. These sprues are dominated by the turrets, which are
four-piece. The turret has nice rivet detail along the perimeter of the crown, siting cupolas forward and ventilation hatches aft. The turret bases have the apron. The
main gun barrels have a hint of muzzle hollowness but it is shallow and you may want to replace with turned brass gun barrels from a third party manufacturer. The
secondary casemates are well done with oval gun openings and vision ports. The secondary gun barrels are present and certainly don’t have hollow muzzles. Four
88mm two-piece tertiary guns are provided with barrels/mount and separate gun shields. The gun shields have site openings. Excluding the open small steam launch,
which is not used for
Lutzow, each sprue has two steam launches with cabins in different patterns and four open boats, each with a unique pattern. Other parts on
the B sprues include detailed parts for the conning tower, anchor windlasses, searchlights, conning tower gun director, solid bridge wing support frames (used the
alternate support frames provided on the photo-etch fret), three-piece kingposts with booms, aft conning tower top and director, German square style Carley rafts,
cleaning rod storage canisters, ventilation louver towers, anchors, and small mushroom ventilators. A small C sprue has all of the torpedo net booms in four different
patterns, as three of the booms near the bow on each side were of different lengths than the bulk of the booms. Each of the booms has reinforcing band detail. D
sprue is one-piece and appears to be a circular breakwater with inner face gussets surrounding most of A barbette.
E sprue is rather large and as with the B sprues, certain parts are not used. A couple of the differences between Lutzow and Derfflinger were the shape of the aft
funnel and bridge deck. The parts not used on E sprue are those for the aft funnel and bridge deck for
Derfflinger. The sprue is dominated by the shelter deck, which
has outstanding planking detail with butt ends. The numerous coal scuttles are slightly raised, which facilitates painting but normally these fittings would be flush with
the wooden deck. The five deck access hatches have hinge and dog detail. Raised lines provide the attahment locations for the superstructure. Other shelter deck detail
included lockers along the barbettes, aft skylight, open chocks, locater holes for ventilator towers and two small wedge-shaped ventilators. Each of the funnels is one-
piece so there will not be any seam lines. The aft funnel has the lower wider casing found only on
Lutzow and both funnels have delicate climbing rung, footrail and
funnel cap detail. The
Lutzow upper navigation deck has steel panel detail, signal lamp bases (which will have to be removed for Lutzow) and is almost the same as the
Derfflinger deck. The only difference that I could see is that there was slightly more distance between the aft face of the chart house and the forward  face of the
forward funnel with the
Lutzow platform. The larger bridge deck has the same steel panel lines and raised locater lines for the conning tower, chart house, signal lamps
and forward funnel. The chart house has port hole and door detail. Parts for both masts are on the E sprue. They include lower masts, top masts, crows’ nests, and
yards. Other parts on the E Sprue are funnel platforms, rectangular louver ventilation towers, signal lamps, forward search light platform lattice (use the alternate brass
lattice on the photo-etch fret), binnacles, forward and aft search light platforms, cable reels, support frame for the search light platform on the front face of the aft
funnel, binocular posts, ventilation cowls and tower ventilation louvers.

F sprue is a single piece, the 01 level upon rests the shelter deck. At the forward end is B barbette and the aft end has very fine ventilation louvers molded onto the
bulkheads. Most of the bulkheads on each side have the locations for the casemate guns. There are a couple of doors on the forward bulkheads but on the aft
bulkheads there are also doors with dog detail and port holes.  G sprue is another one-piece part of the 02/03 levels forward.  Forward on both levels are square
widows with shutters in the open position. Aft are the normal circular port holes. Additional bulkhead detail includes doors with dog detail, climbing rungs and vertical
cables. The deck detail on this part is very busy with the deck planking with butt end detail, thin boat chocks, thin splinter shields, raised coal scuttles, deck access
hatches, skylights and locater holes for ventilator towers, locater lines for a separate part of the 03 level and for the bridge. Sprue H is one piece of the aft portion of
the 03 level. It is a rectangular deck house with fine ventilation louvers on three sides. K Sprue is the main flush deck. The wooden planking has the same butt end
detail as found on the other decks in the kit. There are smooth anchor chain plates running from horse-collar deck hawses to the locater holes for the windlasses.
Forecastle details include chain locker fittings, detailed deck access hatches, skylights, lockers, raised coal scuttles, fine twin bollard fittings but overly thick open
chocks.  On the quarterdeck the same types of detail are included, minus the anchor equipment found on the forecastle. The J sprue is the baseplate for the hull with
raised lines for the metal weight included with the model. L sprue is the one-piece aft superstructure. Bulkhead detail includes the same outstanding ventilation louvers,
aft conning tower and vertical strakes.                 

The included brass photo-etch fret is rather large. The fret does have relief-etching on some of the parts. About 30% is railing and s is very fine. Most of the railing
has drooping rails, although a few parts have straight railing The parts are custom designed to fit specific locations on the model with the number for each run of
railing identified in the instructions. Some of the railing has canvas dodgers covering the lower railing with the stanchions and railing relief-etched on top of the
dodgers. It is very nicely done and far superior to portraying the canvas covered railing as a solid splinter shield. The bridge and navigation shelters have open
windows. Another relief-etched set of parts are the two doors on the rear face of each turret. Inclined ladders come in three patterns with safety railing and trainable
treads. Ship specific parts are the bridge overhead, optional support lattices for searchlight platforms, navigation deck wing supports, funnel grates, flag lockers,
structure supports, and binocular posts. Generic parts include five runs of anchor chain of different lengths, two long runs of vertical ladder, tripod jack staff, and
tripod flag staff. The decal sheet has white aerial recognition circles for the crowns of B and X turrets, furled and straight naval ensigns in large and medium sizes,
furled and straight national flag with iron cross, furled and straight admiral’s flag, name plates, bow crests, and stern crests.
The instructions ar in the common Flyhawk format with one long back-printed sheet, printed on glossy paper. The front side starts with a parts laydown, ship’s
specifications in English and Chinese followed by general instructions in the same languages and assembly icons. The first assembly panel is hull, deck, casemate
guns and shelter deck assembly. The next panel covers forward superstructure assembly with insets showing detail for assembling brass searchlight platform photo-
etch lattice, navigation bridge and bulkheads, navigation deck wing supports, 88mm guns, navigation deck shelters and boat kingposts and booms. The final panel
(assembly steps 3 and 4) on the front page has boat assembly and attachment, inclined ladder placement and aft superstructure assembly. The back starts with
assembly step 5. This includes bow and stern fittings attachment with insets detailing assembly for main gun turrets, flagbags, mast yards, forward ventilators, and
aft ventilators and 88mm gun attachment. Step 6 finalizes assembly with attachment of torpedo nets, net booms, bridge detail, platform supports, and railing
placement. The instructions finish with a color plan and profile, paint matrix listing colors from Mr. Hobby, Tamiya and
Colourcoats paint numbers and decal
placement. The instructions are color coded throughout and very easy to follow. I used them to identify certain parts and only photo-etch part 32, which looks like a
relief-etched boat chock, has evaded my search.

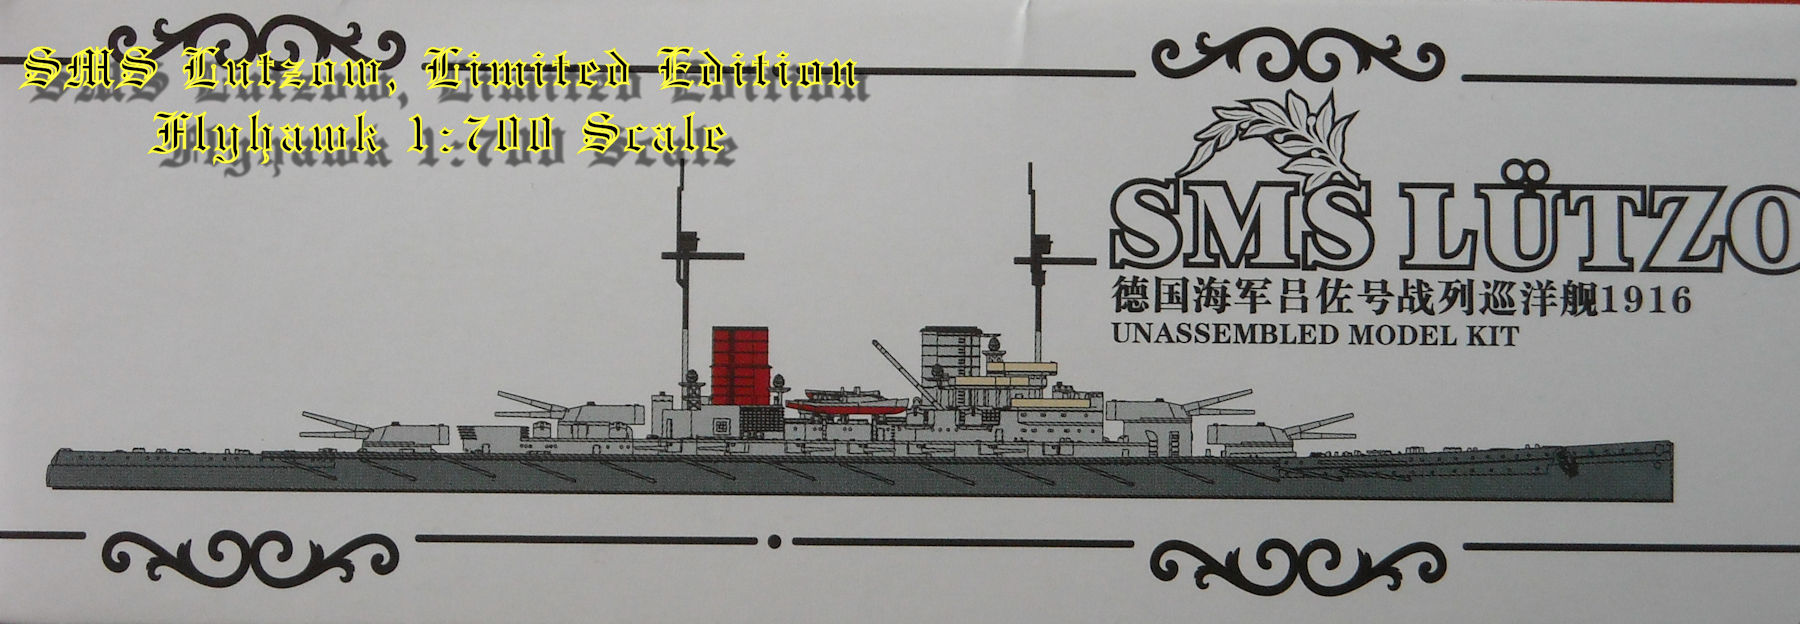
As mentioned, this is the limited edition
Flyhawk Lutzow, which includes the bonus of the large German torpedo boat equivalent of a British destroyer of the G-37.  
This is a complete kit in itself. Since the
G-39 of this class rescued Hipper and his staff from the Lutzow at Jutland, if you feel inclined to follow Kostas Katseas, you
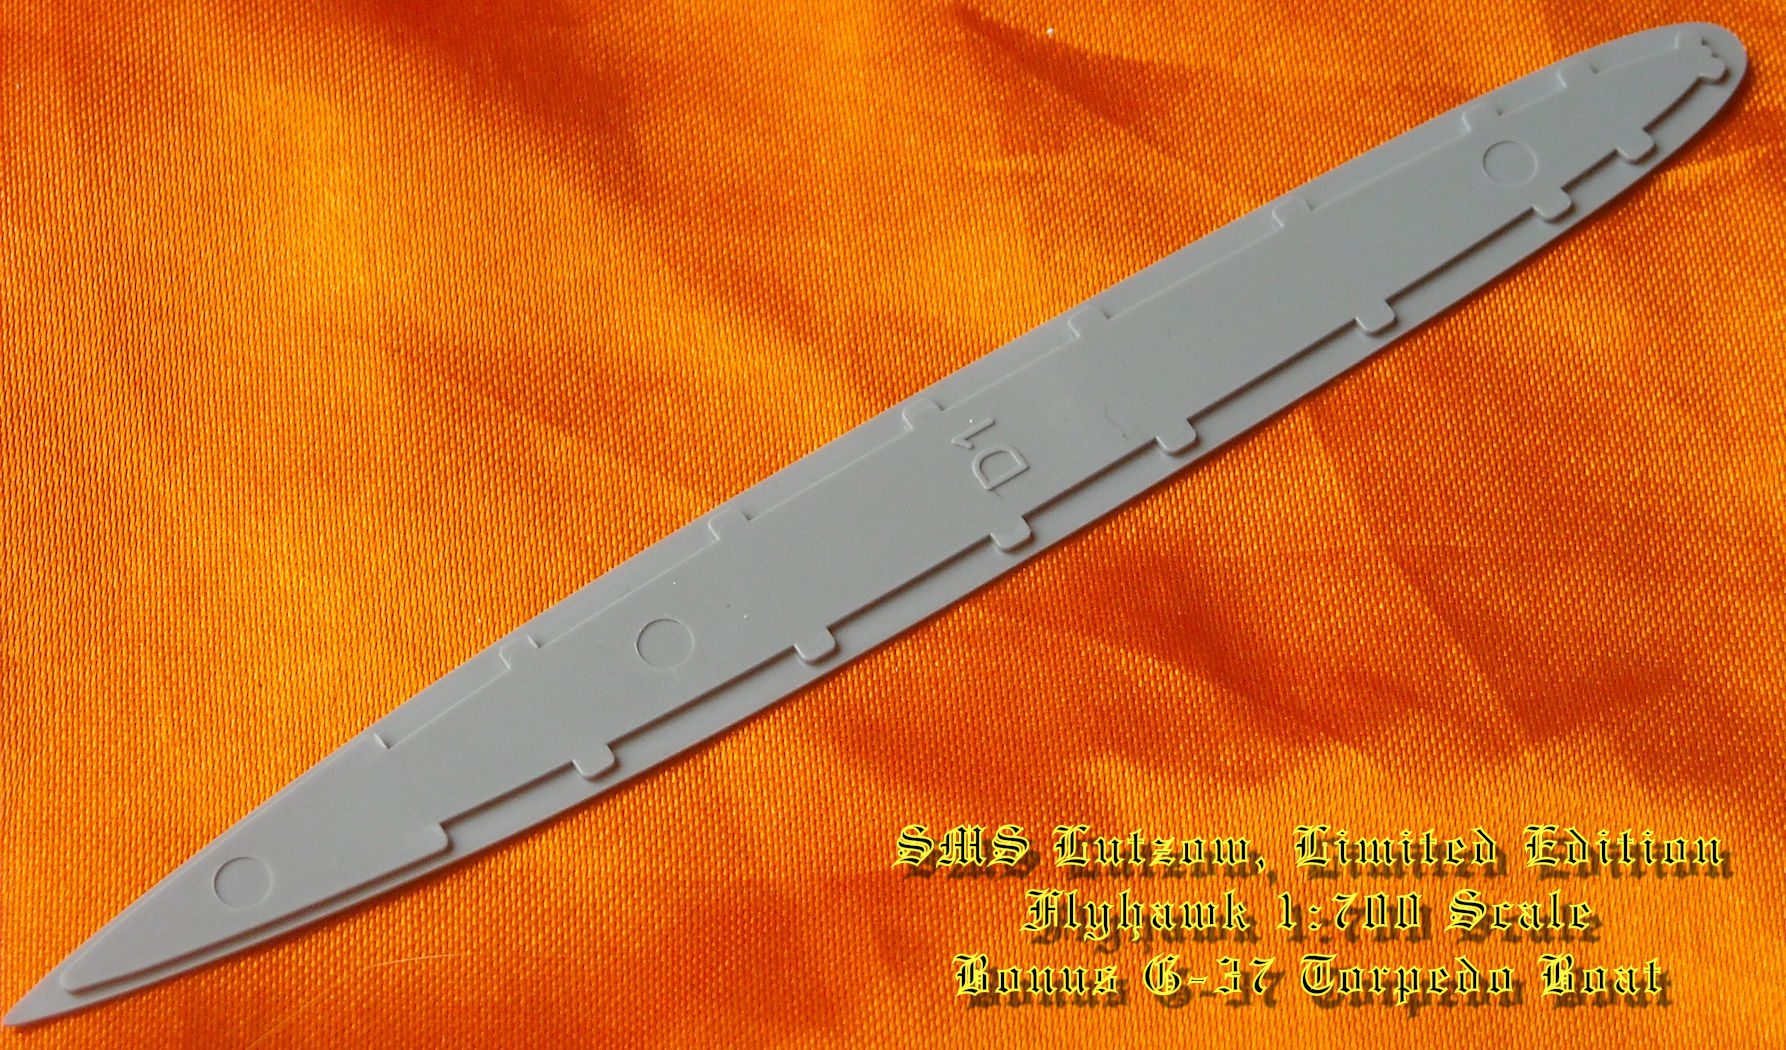
can build a diorama out of the two complete kits included in the limited edition. As you can see from the photographs the
G-37 kit comes with a one-piece hull, base
plate, main deck, sprue of equipment and fittings, photo-etch fret, decal sheet and instructions. In the case of the
G-37 the port holes have eyebrows (rigoles) as well
as horizontal strengthening strakes and molded on raised forecastle with anchor hawse fittings, chain locker fittings, open chocks, bollards, breakwater and locater
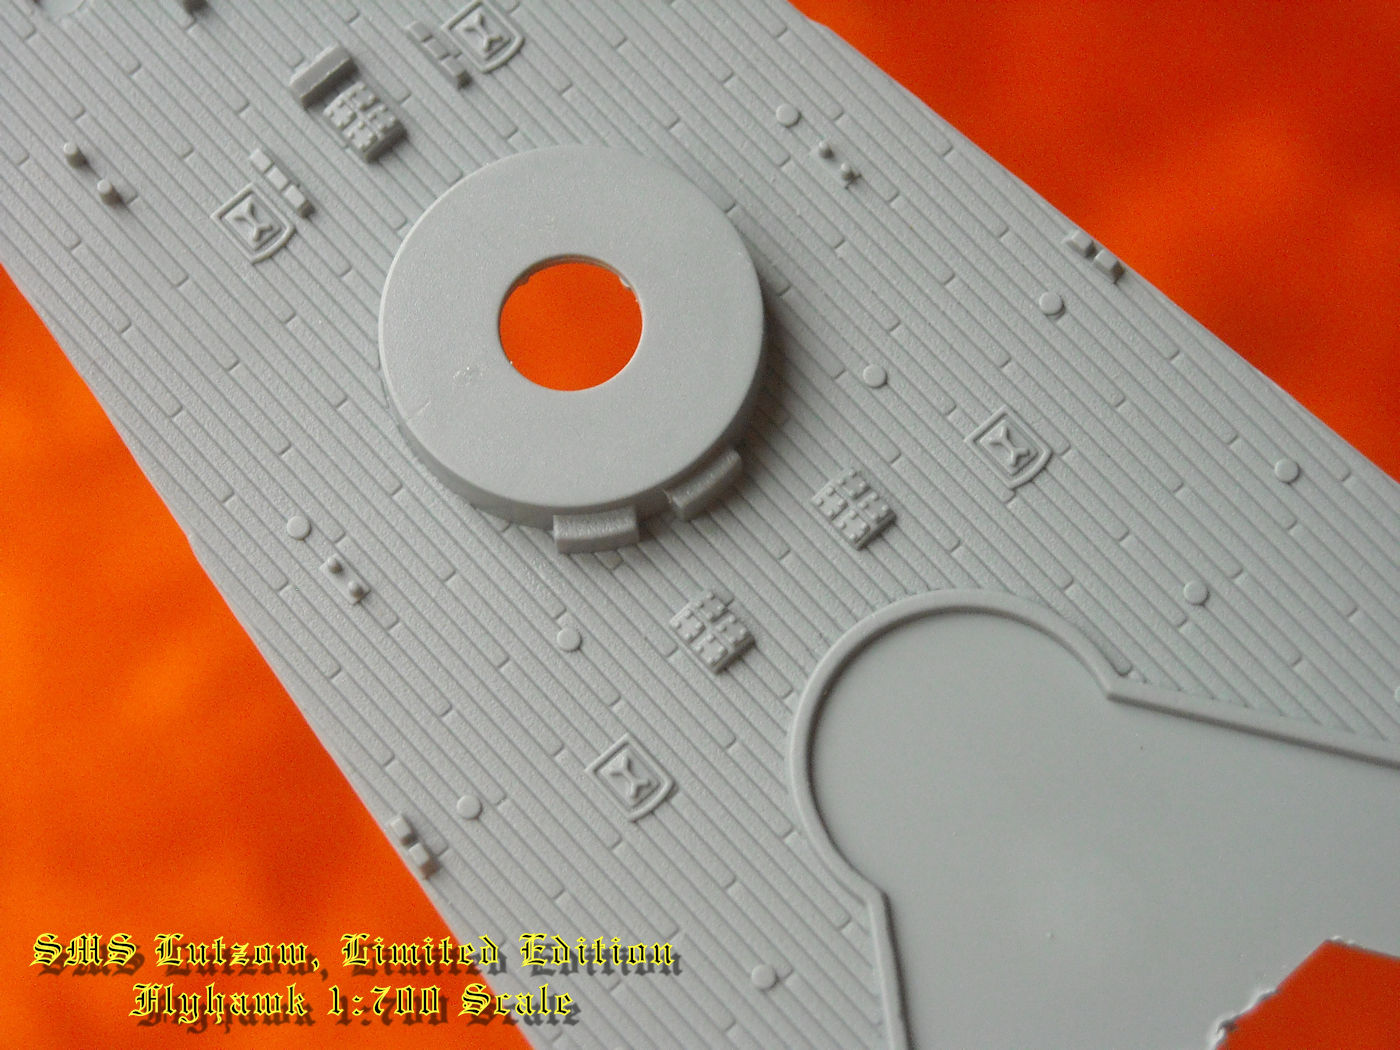
hole for the forward 88mm gun. The main deck has mine rails, hinged access hatches, coal scuttles, skylights, wing torpedo tube tracking rails, centerline torpedo
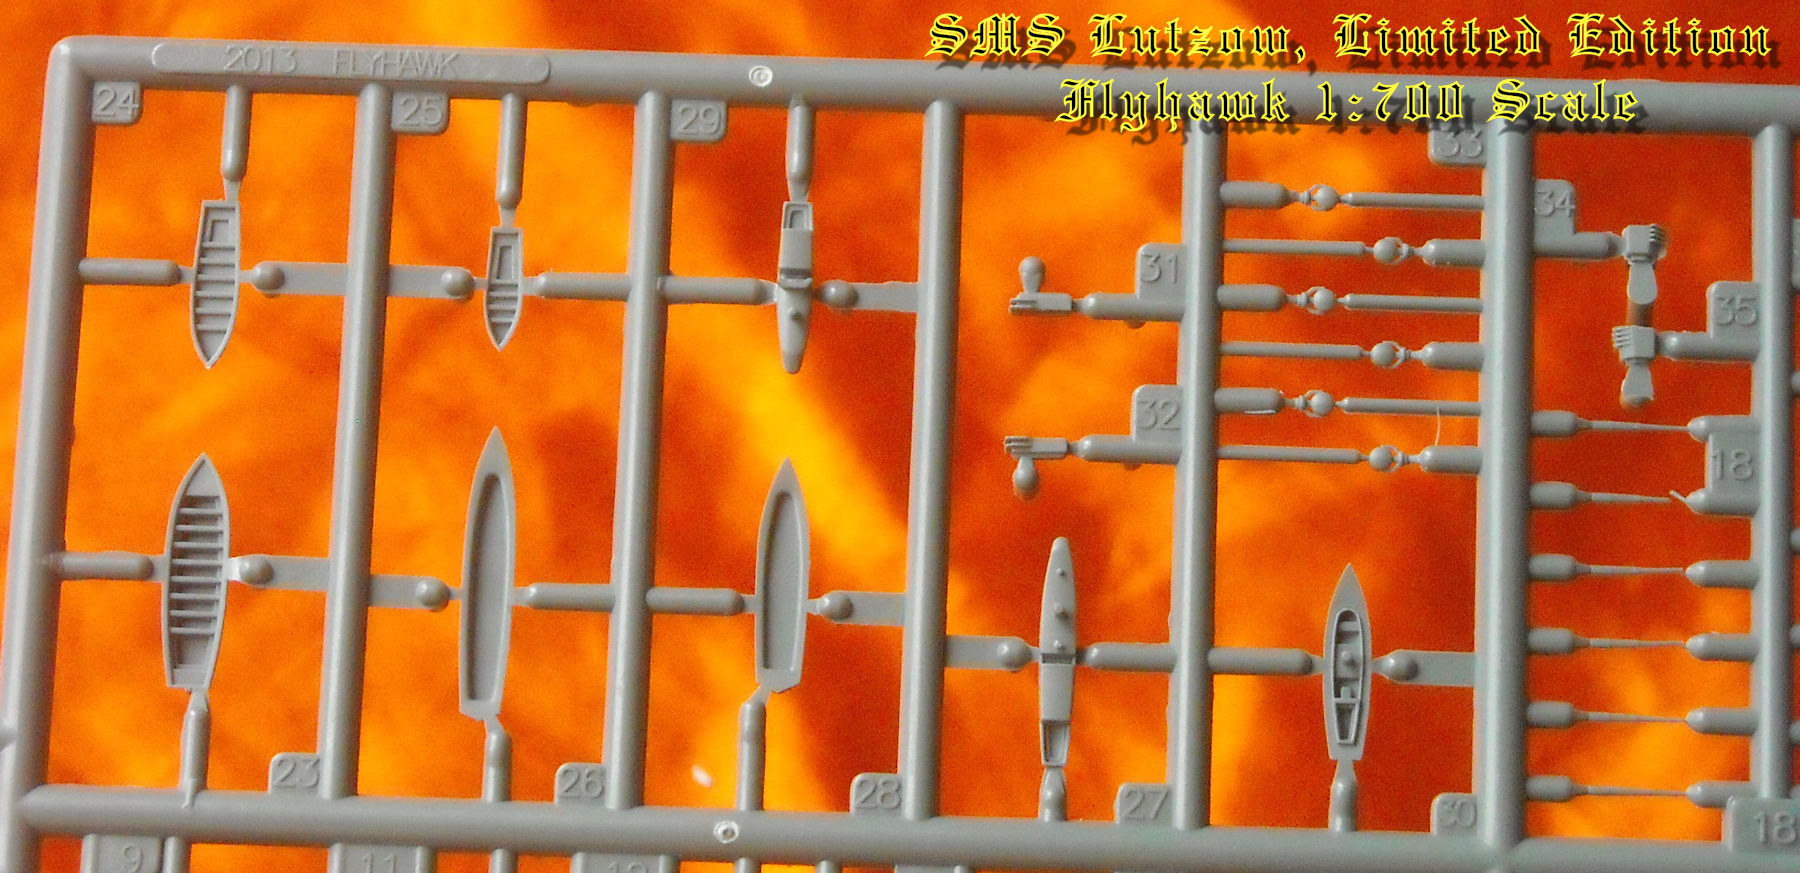
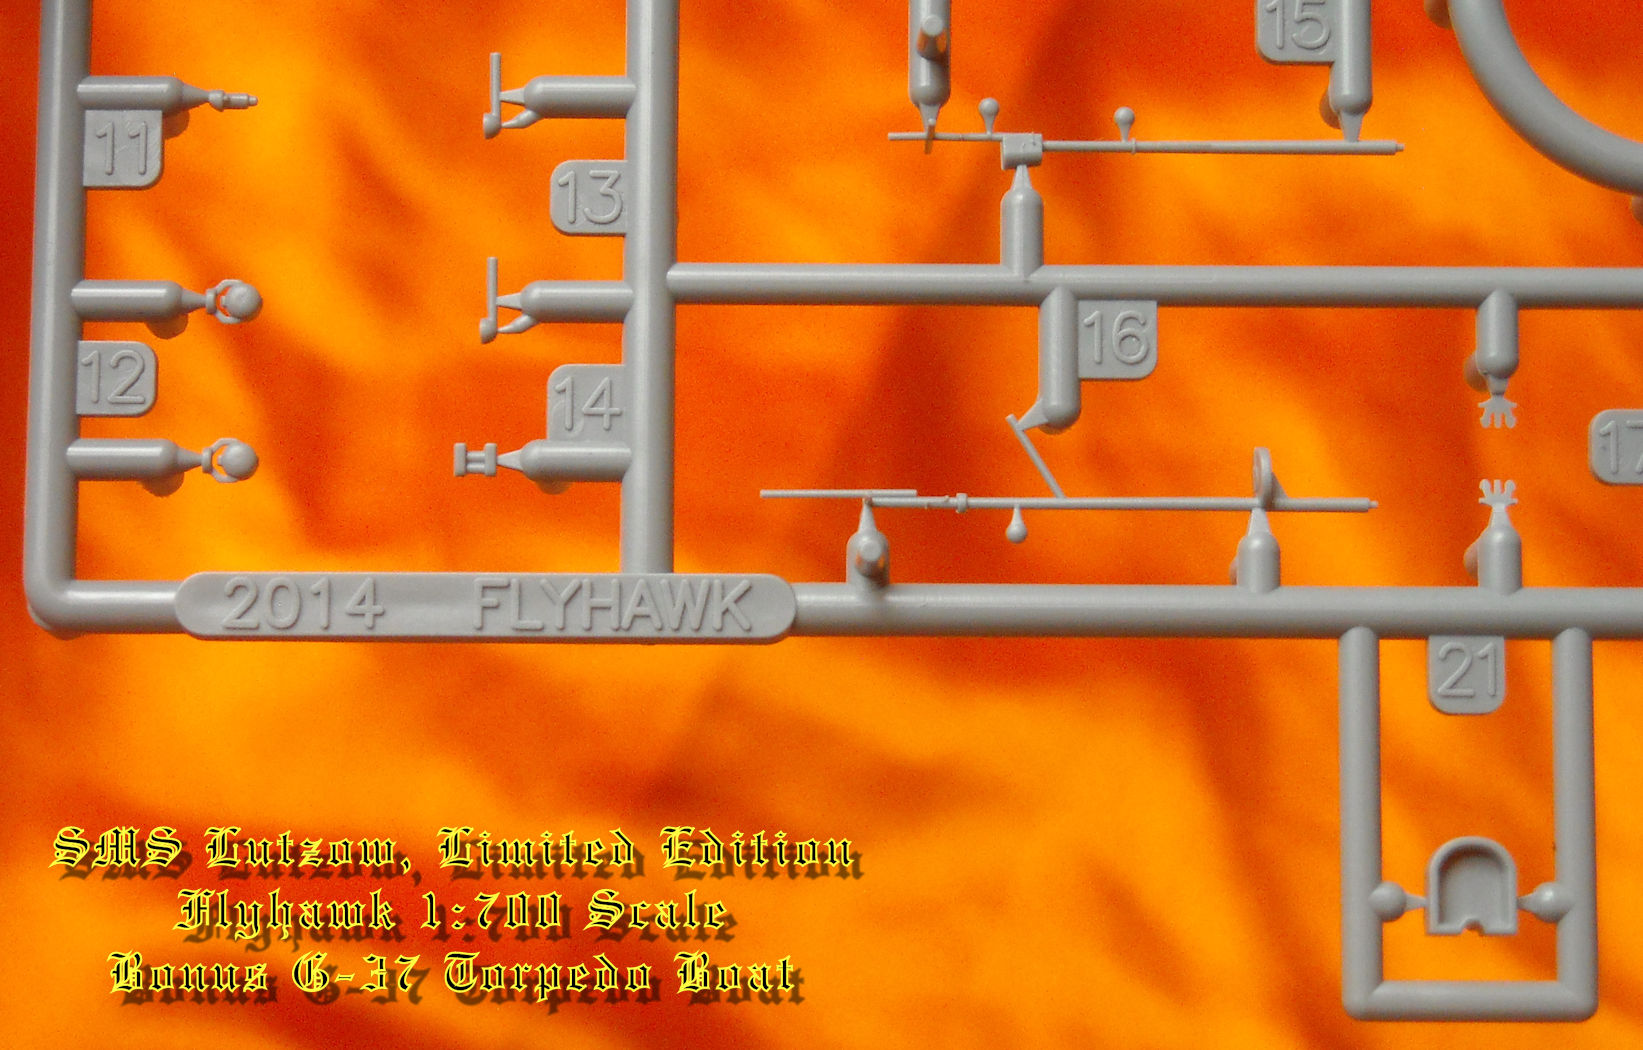
tube turntables, cable reels, funnel bases, various other deck fittings and locater holes. The small parts sprue has 88mm guns much better detailed than those provided
for
Lutzow, detailed centerline and wing torpedo tubes, fore and aft superstructure, funnels, masts, searchlights, binnacle, J ventilation cowls, anchors, ship’s boats,
davits, deck house,  funnel caps with grates, navigation deck, masts, boat crane, amidship 88mm platform and binnacle tower. Why do the port holes have eyebrows
on
G-37 and Lutzow does not and that the 88mm guns are more detailed than those for Lutzow? The reason is simple, the limited edition Lutzow came out one year
later than the standard kit of
Lutzow and the differences reflect the continuous strides Flyhawk has made in improving their products with each new release. The
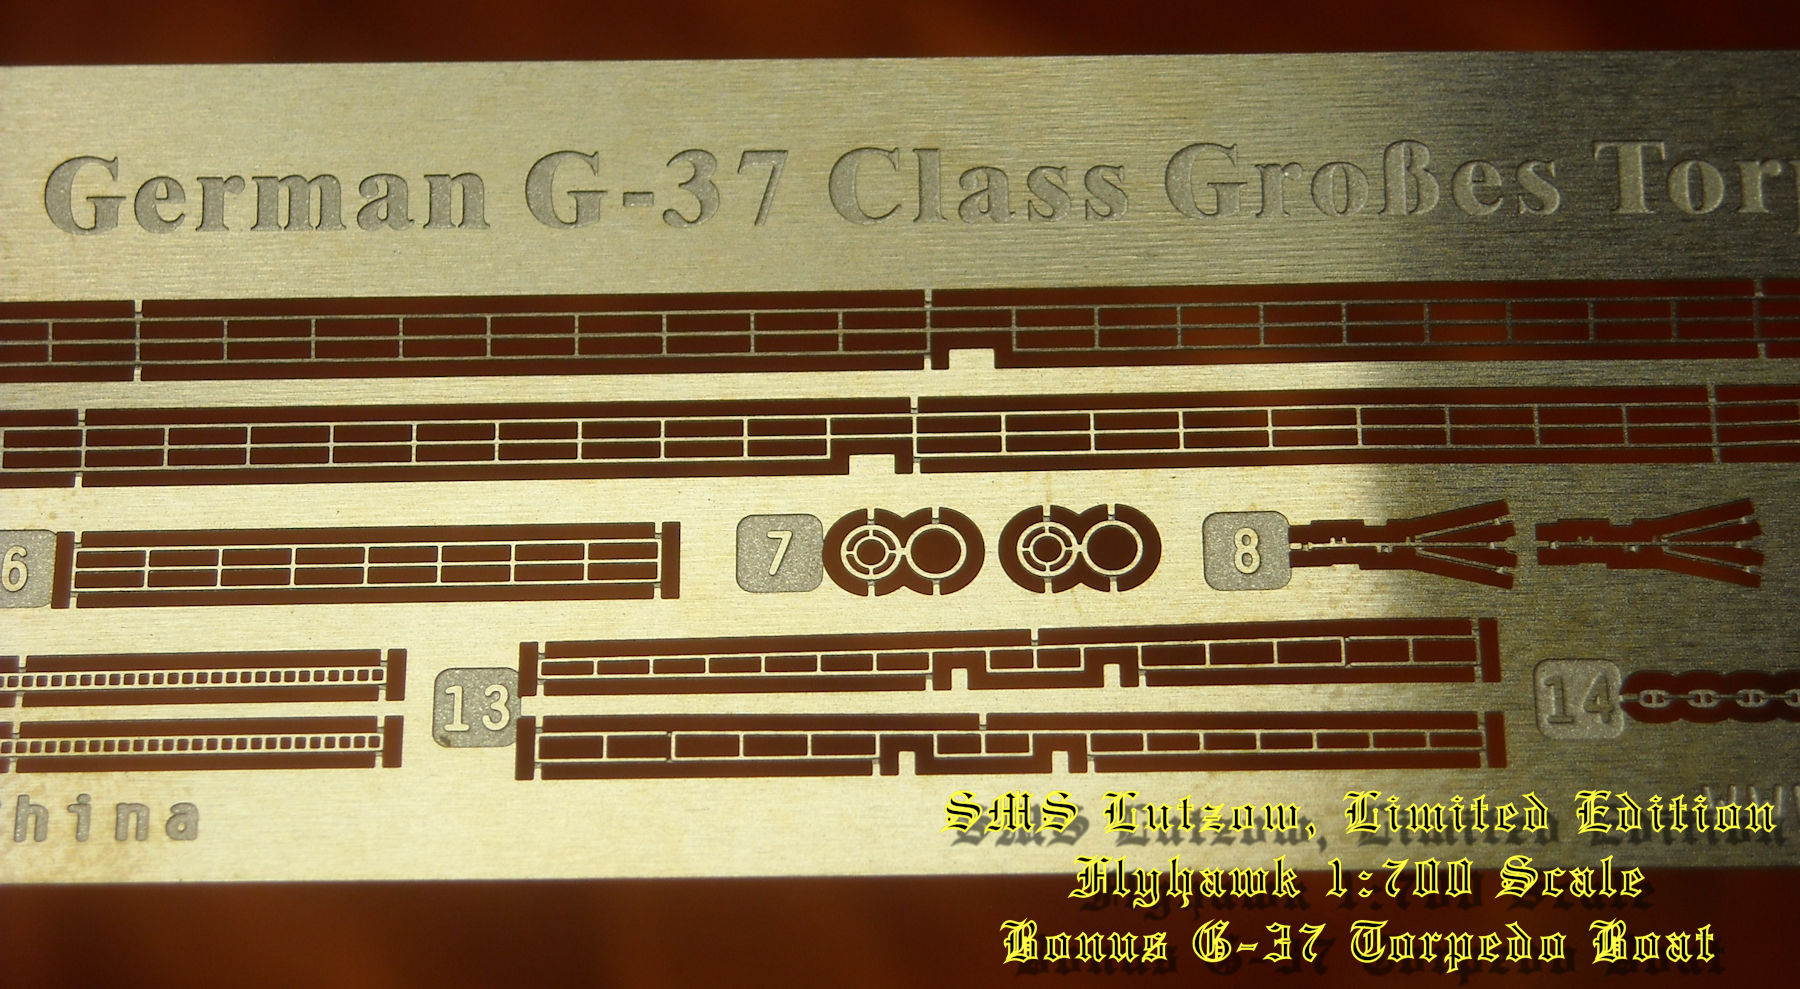
brass photo-etch fret has deck railing, searchlight platform railing, propeller guards, relief-etched anchor chain, jack staff, flag staff, vertical ladder, bridge wing
supports and circular mast platforms. The instructions are complete as well, with one back-printed sheet on glossy paper with three assembly module and a full color
plan and profile and color matrix for Mr. Hobby, Tamiya and
Colourcoats color numbers. Whew, that’s a lot for a bonus!
The Flyhawk SMS Lutzow Limited Edition kit in 1:700 scale packs a lot for your money. Not only do you get a highly detailed kit of Hipper’s flagship at the Battle of
Jutland, which includes torpedo netting as well as net booms, but also, you get a second complete kit as a bonus.
Flyhawk throws in a model of the G-37 large torpedo
boat (destroyer) with photo-etch fret and decals of its own.
Steve Backer
_____________________________________________